Kettle And Canyon
  • Blog
  • About Kettle And Canyon
  • Contact Us
  • Blog
  • About Kettle And Canyon
  • Contact Us

                                  New Skills.  Old ways.

  Kettle And Canyon represents my way of life.
​
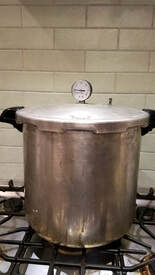
The kettle references teaching myself to pressure can, learning wild game recipes,
and how to cook all usable parts of an animal. The canyon represents the land where
I am learning to hunt big game and fly fish.

​Kettle And Canyon is  my experience in the Rocky Mountains. 

Canning 101

1/14/2020

0 Comments

 
I started canning because I wanted to reduce my use of aluminum cans and make some of my own food. Let's be honest, I am also really terrible at remembering to buy stock at the grocery store. Before I started canning, I would often have to run to the grocery store mid- recipe. And, when you live in the rural Rocky Mountains, "running to the store" is an 80 mile round trip excursion. So, I started making my own. 

The thought of using a pressure canner was absolutely terrifying to me in the beginning. However, due to my elevation (7,000 feet), it was by far the safest option. A pressure canner can be used to preserve/can food and can also serve as a pressure cooker. This is not, however, an Instapot. 

For some of you, the idea of a pressure canner may conjure images of explosions in your great-grandmother's kitchen. That is a fair position. And, the reason it is very important to follow updated processes and recipes. I strongly discourage using old recipes as food safety standards have evolved.

Equipment:
You will need to make an investment up front to be able to can your own food. However, you will see the outcome is absolutely worth it. 

I bought the Presto 23-quart canner years ago and it works like a charm. You can get it on Amazon for less than $80:

www.amazon.com/Presto-01781-23-Quart-Pressure-Canner/dp/B0000BYCFU/ref=sr_1_1?keywords=pressure+canner&qid=1579025461&sr=8-1
Picture
In addition to a pressure canner, you will need:​
  • Jars (I prefer wide-mouth)
  • Lids and rings (will be included with first jar purchase)
  • Vinegar
  • Jar lifter (to remove hot jars from pressure canner)​
  • Funnel (trust me on this one)
  • Ladle 
  • Clean dish cloth

Prep:
​Before you start canning, you need to sterilize your jars. Most people do that by running the glass jars through the dishwasher. Ideally, you will take the warm jars right out of the dishwasher and fill with your food to be canned. 

You also need a clean surface to prep. 
PictureChicken stock after 7 days in crock pot.
Recipe:
Great, so you have bought a bunch of random supplies, but what are you going to make? Let's start with stock.

​ I suggest beginning with stock for a few reasons: 1) you make it in a crock pot and it takes little work, 2) stock is extremely useful, and 3) you probably have what you need in your kitchen.

Stock is super easy to make. Just put bones in a crock pot and add water. Keep it on low for days. I try to keep mine going for a week before I can. Keep adding water to the crock pot as it evaporates. The longer you keep the stock going in the crock pot, the richer your stock will be. You can use bones from any animal: chicken, venison, elk, pork, etc. This is a way to take control of what you eat. For example, do you want organic stock? Use organic bones. Are you trying to decrease your sodium intake? Home-made stock is so much lower in sodium that the store bought brands. 

Every New Year's Eve, we have lobster or crab legs. Every January 1, I start a seafood stock. I do not suggest using seafood stock for everyday meals. We use it for paella because it does have a strong seafood flavor.
​​​
Picture
Canning:
Now you have your supplies, you have spent a week adding water to a crock pot, let's fill the jars with delicious goodness. 
​
As a tip, I will often turn on the stove and start boiling water in the pressure canner before I fill the jars. I am impatient and do not want to wait for the water to boil in the canner after the jars are filled.

I fill the pressure canner with about a liter of water and add a splash of vinegar. The vinegar is to prevent your jars from looking cloudy. Let the water boil in the pressure canner with the lid off as you prep the jars. Once the canner is filled with the jars, you want to be sure there is at least 3 inches of water in the bottom of the canner. You can add more water once the jars are in the canner.

Using your ladle, fill the jars with hot stock out of the crock pot. Do not over-fill your jars.Once the jars are filled, you will want to wipe the rim of each jar with a cloth dipped in vinegar. This ensures you will have a clean seal. 

Next, place the lids inside the rings and screw on the lid. You do not want to over-tighten the jars. ​
Picture
Now we are ready to put the jars into the pressure canner. You want to leave a little space between each jar. Your pressure canner will explain how many jars it can accommodate. My pressure canner can handle 7 quarts at a time.

Picture
It is very important to check the lid of your pressure canner before every single use.  Look through the steam valve to be sure you can see through it and it is not clogged. (The valve is the spout coming out of the lid that the weighted gauge will eventually cover.) The steam valve can become blocked, which is very dangerous. Once you have checked that the valve is clear, you are good to put the lid on the pressure canner.

You need to allow steam to flow steadily out of the steam valve before you add the weighted gauge. This will take a few minutes. Once you can visibly see steam coming out of the gauge (located to the right of the dial in this photo), you can put the weighted gauge on the pressure canner. 

Once you add the weighted gauge (the little metal piece that rocks), the pressure will begin to build in the canner. The PSI (number on the gauge) and cook time will vary drastically depending upon your elevation and what you are canning. I always check the National Center for Home Food Preservation or the Ball Complete Book of Home Preserving for cook times and PSI.

For quarts of meat stock in a weighted-gauge pressure canner, you need PSI of 10 if you are under 1,000 feet in elevation and PSI of 15 if you are over 1,000 feet. I can almost everything at PSI 15. This means that you wait until the dial reaches 15 before you start your cook time.

For quarts, you will maintain the PSI at 10 (if under 1,000 feet) for 10 minutes. If you are above 1,000 feet in elevation and canning at 15 PSI, you will cook for 15 minutes. Once time is up, turn off the stove. DO NOT open the pressure canner until the PSI is at 0 and the pressure is gone from the canner. If you open prematurely, the jars can explode and all of your work is ruined. 

Once the pressure is out of the canner, remove the jars with the jar lifter. Place the jars onto a heat safe surface on a dish towel. Do not allow the jars to touch one another. Over the next few hours, you will hear the jars popping. That is okay. Once the jars are cool, push each lid to make sure it is solid. If it pops, you will need to use it within a few days and refrigerate it, as you do not have a good seal.

So, this sounds like a really long involved process, but it really is simple. The first time will take you longer, but by the second or third time, this is a breeze. I can while I am meal prepping, doing laundry, watching TV, etc.
​
Happy canning, friends!

0 Comments


Leave a Reply.

    About Beth

    From no experience in the outdoors and few culinary skills to big game hunting and rendering elk lard, this is my journey.

    Archives

    March 2023
    February 2023
    February 2022
    October 2021
    September 2021
    August 2021
    July 2021
    April 2021
    November 2020
    October 2020
    July 2020
    May 2020
    April 2020
    March 2020
    February 2020
    January 2020

    Categories

    All

    RSS Feed

Powered by Create your own unique website with customizable templates.